A Natural Approach to Seasonal Allergy Relief


Spring is a wonderful time of year. The weather warms up, flowers start to bloom, trees leaf out and people spend more time outdoors enjoying nature, other people and the world around them. Unfortunately, for many people, spring is also a time of continual discomfort, if not outright misery, thanks to pollen-based allergies.
Solutions can range from leaving town for a few weeks - I have a neighbor that does this every year - to spending tens or hundreds of dollars on prescription medicines that may leave you feeling tired or spaced-out. Fortunately, there are better ways to find allergy relief.
I use a three-part approach that has made a huge improvement in how I feel during allergy season. I now look forward to and enjoy spring each year. While implementing only one or two parts of this approach should bring some relief, I believe it works best when all phases of the plan are put into action!

Part 1
Start using a homeopathic allergy remedy. The product I use is a tincture called Bio Allers Tree Pollen. Homeopathic medicines are easy to use and there are no side effects. I use ½ dropper under my tongue each morning. It is best to start a couple or three weeks before you expect allergy symptoms to start each spring; continue use through the allergy season.
Bio Allers Tree Pollen natural allergy remedy is based on pollen from trees that flower and produce pollen in spring. There is a version for grass pollen to be used if you have late summer or fall allergies.

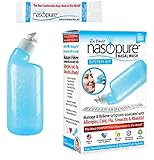
Part 2
Start using a neti pot. Neti pots are an effective way to flush out the sinuses. They are only slightly more difficult than taking homeopathic medicines. It can seem awkward if you have not used one before, but, after two or three tries, you will have the hang of it. I use a neti pot every morning during allergy season and occasionally throughout the rest of the year. There are links to neti pot instructions at the end of this hub.


Part 3
Begin a daily yoga practice. This could be the least (or maybe the most!) important part of this three-step approach. If you are new to yoga, it will take awhile to start impacting your body’s response to allergies. It will, however, have more of a positive impact on other areas of health than Parts 1 and 2. It is best to learn yoga in a class (or private lesson) with a well-trained teacher. An experienced teacher should have some recommendations on yoga poses, or a sequence of poses, that will help with allergies.
While there is no substitute for personal instruction, here is a short sequence of yoga asanas (poses) that may help provide both short and long term relief for allergies:
Baddha Konasana - bound angle pose
Sirsasana - headstand and/or Prasarita Padottanasana - wide-leg forward extension
Viparita Dandasana - upward facing two-legged staff pose (using a chair)
Sarvangasana - shoulderstand (Use blankets to support the shoulders! A chair is optional)
Setu Bandha - bridge pose (supported with blankets or a bolster)
Savasana - corpse pose (supported with blankets)
Practice this sequence as shown in the photos. There are numerous sources of information if you need help for individual poses. If you are new to inverted poses, learn them from a yoga teacher.


")

You could spend a total of anywhere from 20 to 40 minutes completing this sequence of poses. Repeat 2 or 3 times a week, or even every day, during allergy season. It is best to have a well-rounded yoga practice that also includes other sequences of poses.
Again, it may be that just Parts 1 and 2 will be enough to tame your allergies, but the addition of yoga will give additional relief and provide other benefits as well.
© 2012 chet thomas


 Relief from Hives and Eczema Rashes In Under One Minute, Naturally")

